Dark Chocolate Waffles
An article on epicurious.com recently advertised "12 Totally Legit Ways to Eat Chocolate for Breakfast" and naturally, I was intrigued. Or salivating. Or both. Probably both seeing as you know my affinity for both chocolate and breakfast. So it was pretty much a done deal at that point. I was not only going to find a legitimate way to indulge a cocoa craving during my favorite meal, I was also going to bring this joy to the masses.
Okay, maybe not the masses. Let's start small and share with my girlfriends. What better place than at a champagne-filled bachelorette weekend? Precisely. No one will turn down waffles, much less chocolate ones. And throw in a mimosa followed by a day of wine tasting finished with a hot tub? Weekend paradise at its finest.
The problem with cooking not in your own kitchen is the basics. Sounds dumb, but you take them for granted. For example: flour? check; sugar? obviously; baking soda? of course; salt? which of 5 types would you like?
However, if you enter a different kitchen (especially in a rental property), you never know what they will have. Could be 14 half-empty bottles of ketchup and some old pickles. Could be a fully stocked dream with a food processor AND a dutch oven. Usually it's something in between with cheap pots and pans, poor quality knives (my biggest pet peeve ever) and a few baking staples of unknown age.
I like making things from scratch but I am nowhere crazy enough to tote all of my own essentials around in my trunk. So, in a case like this, I simply mix up the dry ingredients in a portable container and bring measured amounts of the wet ingredients separately.
Yes it takes foresight, but it also saves on a lot of work and it worth it.
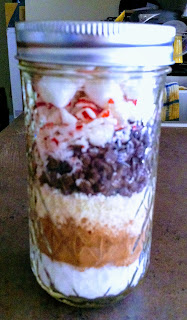
And if you want to be disgustingly cute you could always layer the dry ingredients in a little mason jar and attach a little tag so the guests could bring it home as a favor and enjoy chocolate waffles in the comfort of their own homes.
These are cute little favors I made for peppermint hot chocolate for a wedding shower a couple of years ago. Layer things up and throw on a ribbon and people will love them!
But I digress. Let's make waffles!
Throw on that apron with style... you've got a lot to look forward to today!
Start heating up your waffle iron. And be prepared - the warm chocolaty goodness will be so popular that once you start cooking you won't stop until you've scraped every drop of batter from your bowl.
In a medium bowl combine flour, cocoa, sugar, baking powder, baking soda and salt. Mix well and set aside.
** If transporting to a different location, transfer to a plastic container with a tight fitting lid. If making into favors consider using a funnel and layering into a mason jar. You'll also want to add the chocolate chunks to the top.
When ready to mix up the waffles, separate egg yolks and whites. Add buttermilk, yolks, olive oil and vanilla to the dry ingredients. Mix well.
** Please do not use a different oil in this recipe. The olive oil brings a fruity component to the waffles which enhances the dark chocolate flavor. Trust me, you will not regret it and might appreciate olive oil even more hereafter.
In a separate bowl, beat whites until stiff peaks form. Normally I would use a hand mixer on high speed. Except I forgot to bring mine with me for the weekend. Thank goodness I had a whisk and 2 arms. It takes time to whip them to stiff peaks!!
Fold into dry ingredients.
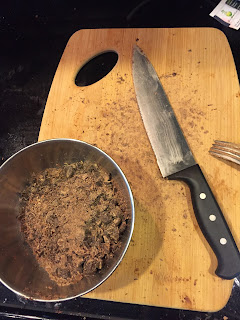
Finely chop the dark chocolate.
Add chocolate chunks and mix just until combined.
Spray the waffle iron with nonstick spray and add just enough batter to cover the bottom. The actual volume varies depending on your machine. A Belgian waffle maker might need 3/4 of a cup of batter per waffle while a thinner version might need 1/3 of a cup. Cook according to directions or until puffed in the middle and crispy on the edges.
Serve immediately with homemade whipped cream and pure maple syrup.
Published 02/2014
Okay, maybe not the masses. Let's start small and share with my girlfriends. What better place than at a champagne-filled bachelorette weekend? Precisely. No one will turn down waffles, much less chocolate ones. And throw in a mimosa followed by a day of wine tasting finished with a hot tub? Weekend paradise at its finest.
The problem with cooking not in your own kitchen is the basics. Sounds dumb, but you take them for granted. For example: flour? check; sugar? obviously; baking soda? of course; salt? which of 5 types would you like?
However, if you enter a different kitchen (especially in a rental property), you never know what they will have. Could be 14 half-empty bottles of ketchup and some old pickles. Could be a fully stocked dream with a food processor AND a dutch oven. Usually it's something in between with cheap pots and pans, poor quality knives (my biggest pet peeve ever) and a few baking staples of unknown age.
I like making things from scratch but I am nowhere crazy enough to tote all of my own essentials around in my trunk. So, in a case like this, I simply mix up the dry ingredients in a portable container and bring measured amounts of the wet ingredients separately.
Yes it takes foresight, but it also saves on a lot of work and it worth it.
And if you want to be disgustingly cute you could always layer the dry ingredients in a little mason jar and attach a little tag so the guests could bring it home as a favor and enjoy chocolate waffles in the comfort of their own homes.
These are cute little favors I made for peppermint hot chocolate for a wedding shower a couple of years ago. Layer things up and throw on a ribbon and people will love them!
But I digress. Let's make waffles!
Throw on that apron with style... you've got a lot to look forward to today!
Start heating up your waffle iron. And be prepared - the warm chocolaty goodness will be so popular that once you start cooking you won't stop until you've scraped every drop of batter from your bowl.
In a medium bowl combine flour, cocoa, sugar, baking powder, baking soda and salt. Mix well and set aside.
** If transporting to a different location, transfer to a plastic container with a tight fitting lid. If making into favors consider using a funnel and layering into a mason jar. You'll also want to add the chocolate chunks to the top.
When ready to mix up the waffles, separate egg yolks and whites. Add buttermilk, yolks, olive oil and vanilla to the dry ingredients. Mix well.
** Please do not use a different oil in this recipe. The olive oil brings a fruity component to the waffles which enhances the dark chocolate flavor. Trust me, you will not regret it and might appreciate olive oil even more hereafter.
In a separate bowl, beat whites until stiff peaks form. Normally I would use a hand mixer on high speed. Except I forgot to bring mine with me for the weekend. Thank goodness I had a whisk and 2 arms. It takes time to whip them to stiff peaks!!
Fold into dry ingredients.
Finely chop the dark chocolate.
Add chocolate chunks and mix just until combined.
Spray the waffle iron with nonstick spray and add just enough batter to cover the bottom. The actual volume varies depending on your machine. A Belgian waffle maker might need 3/4 of a cup of batter per waffle while a thinner version might need 1/3 of a cup. Cook according to directions or until puffed in the middle and crispy on the edges.
Serve immediately with homemade whipped cream and pure maple syrup.
Dark Chocolate Waffles
Published 02/2014
Ingredients
- 2 cups all purpose flour
- 1/2 cup unsweetened cocoa powder
- 1/4 brown sugar, packed
- 2 teaspoons baking powder
- 1 teaspoon baking soda
- 1 teaspoon salt
- 3 large eggs, separated
- 2 cups buttermilk
- 1/2 cup olive oil
- 1 teaspoon vanilla extract
- 6 ounces bittersweet chocolate, chopped
Instructions
- In a large bowl, whisk together dry ingredients until combined. Add egg yolks, buttermilk, olive oil and vanilla and continue to mix until all combined.
- Using an electric mixer, beat egg whites at medium-high speed until they form peaks. Fold egg whites into the batter. Fold in chopped chocolate.
- Heat waffle iron and lightly spray with nonstick cooking spray. Add batter and cook until crispy on the outside and cooked through the center.
- Serve immediately with fresh whipped cream and pure maple syrup. Keep extras in a warm oven until everyone has eaten. Freeze any extras for the future.


Comments
Post a Comment